30 June 2014

A little catch up


Oh my goodness, what a lovely few days away we had last week.  My parents headed off to Norfolk on holiday and as luck would have it, booked a two bedroom holiday cottage slap bang on the Norfolk Broads. They asked if we would like to join them for a couple of days like we did last year, well it would have been rude not too! 

The cottage was beautiful, but the absolute best bit was being able to sit by the river, which apart from a couple car boot sales, is pretty much what I did for two days............


I had contemplated taking some of my works in progress, but decided that Poppy's quilt was too big to carry around and my crochet cushion required lots of concentration.....I've been joining the squares together with double crochet...I know that would seem not a difficult task, but for me, well lets not go there.....so a new crochet project has begun.....a blanket....oh yes....it may take me an age..... but a blanket will be mine!!!!

Seeing as I am going to be carrying this one around for quite a while, I thought I would take inspiration for the colour scheme from my Cath Kidston crochet bag....

As well as the ducks and swans...... we also an array of birds including the most stunning Barn Owl, sadly I wasn't quick enough to grab my camera, but then Mum spotted this chap in the field beyond....what a site!


  I am now counting down the days until we return for our annual family holiday.
 Back home I've been admiring the treasures that I snaffled as car boot....the jug was far to pretty to leave behind, the baskets, well you can never have to many baskets and I was so thrilled to find a piece of vintage snowflake pyrex to add to my collection.


Having not sewn for an entire week, I couldn't wait to get stitching again.  My project was a party dress for Poppy to wear to my brothers wedding this summer.  I wanted it to be really special and had set my heart on a dress with a Peter Pan collar, so I was extremely chuffed when I found this pattern.  As for the fabric, I gave Poppy the choice from any of the fabrics in the shop and she chose the pretty floral from the Little Red Riding Hood collection....good choice I think....I wanted the sash to be in a contrasting fabric and after much deliberation chose the red stripe by Sevenberry.  The pattern calls for it to be cut on the cross, which I think has been really effective, although it does make my eyes go a little squiffy...that may however be down to my new varifocal glasses!


I added some pretty lace trim to the sleeves and the hem and after much fiddle..... fully lined the whole thing, adding some net I had in my stash, in between.......Obviously it has now been put away safe and sound and well away from sticky fingers ready for the big day....now all I need to do is to make something for me wear!

I hope that you all had a lovely few days and I'll back soon with a ta dah!!!! 


Share:

21 June 2014

A Skirt and Some Shorts

Behind the scenes, Mum has been doing some sewing for Poppy....are they not the sweetest ever..... thanks so much Mum!!
I picked up a set of t shirts from Sainsbury's and gave them to Mum. She and Poppy them picked out fabrics to match....it certainly makes dressing easier (whispers when Daddy is choosing her clothes)

The shorts were made using this pattern and the skirt was from this pattern and Mum tells me they were easy and really quick, so win win!

She also added a lovely finishing touch so Poppy knows which is the back.....

Before I go, just a little heads up, we're having a couple of days away next week and Andy parents are coming down to look after the children,  so any orders placed from mid afternoon Monday, will be sent out from Friday.

Enjoy your weekend!

Share:

20 June 2014

Veg, Veg and more Veg

Wednesday, early evening there was a knock on the door. I went to answer and was met by a lovely smiley lady (a complete stranger) asking if Andy, my husband lived here.......obviously seeing the look of confusion and slight worry on my face....she swiftly said that she had been at cub camp with him the previous weekend and had a thank you gift in the boot of her car from the committee .......this was it......

a HUGE box of veg and I mean HUGE!


Inside the box was 2 packets of baby courgette, 5kg of carrots, 20 courgettes, 4 leeks, 1 pointy cabbage, 1 white cabbage, 1 red cabbage, 3 aubergines, 2 cauliflowers, 2 bunches of beets, 1 marrow, 3 corn on the cob and 4 bulbs of broccoli


Now we love eating veg, but on top of the veg already in the house, the challenge was on as to what to do with all of this so that none went to waste.

First off, a phonecall to mum who had some courgettes, carrots and the pointy cabbage.  Then out came my favourite cooks books..........

First in my trusty cast iron pan was a mixed veg soup, a family favourite.  I threw in some carrots, courgettes and leeks from the box and added celery and parsnips from the fridge.  It has loads of cumin added so has the most wonderful smell.  Served with grated cheese and crusty bread, delish!  (6 portions of this are now in the freezer)

Next in the pan, I adapted the recipe for 'Courgette, Pea and Spinach Soup' from 'The New Covent Garden Food Co - A Soup for Everyday'  my version had broad beans from the freezer instead of spinach and I also added a generous amount of mint.  I have to say the end result looked a little but like green gloop, but my chief taster Jamie, said it was lovely. (6 portions now frozen)

Next in the pan, 'Broccoli and Stilton Soup', again from the 'A Soup for Everyday'.  Andy and I had this for lunch today and considering that he doesn't like broccoli or stilton cheese it was an amazing success.....work that one out!  (another 6 portions of this frozen)

... yet another Covent Garden soup in the making.....can you tell we like soup!!  This one was 'Mediterranean Vegetable and Tomato'.......it had smoked paprika and balsamic vinegar added before the stock and smelt divine as it was cooking.
For all the recipes, I've been doubling the quantities, which mean't adding two litres of liquid.  I felt this was too much so I reduced it to 1 1/2 litres, but even this made a runny soup.....not a good thing when children are eating as it generally ends up down there tops!  Tasted great, but this is definitely a serve in a mug soup.  (8 portions for the freezer)
Now on to last nights supper...and a glass of wine... I set to prepping some aubergine. I always think they look very appetizing, but I have to confess they're a veg that I never normally buy.  I turned to Nigel Slater for inspiration and he well and truly came up trumps with 'Baked Aubergine with Sheep's Cheese and Mint'.......(from the Kitchen Diaries)
You simply sliced then drizzled them with a little olive oil, seasoned with black pepper, garlic and dried oregano and popped them in the oven for 20mins or so.  Once cooked, you scraped out the middle and crumbled on feta cheese and fresh mint (we used dried mint).  We followed his recommendation and ate them along side minted lamb burgers, some lightly spiced potato wedges and I made my favourite Greek yogurt dip where you simply stir in chopped chives and lemon juice.  Hooray for aubergines, this was a massive hit!

This evening we're eating the marrow filled with bolognese sauce (we batch cook both bolognese and chilli con carne and then portion it off for the freezer) Over the weekend I'll be braising and freezing down the red cabbage from Delia Smiths 'The Complete Cookery Course'.  I bought my copy of this brilliant book when I was 19 and just about to leave home, this is the book I'll buying my children when they leave home. Tomorrow I'll be cooking up another batch of 'Med Veg and Tomato Soup' for lunch and the corn on the cob will be going into a tuna pasta bake for supper.  We'll be having the white cabbage and some more carrots with roast chicken on Sunday.

The cauliflower has been chopped into florets and frozen whilst raw, which leaves me with beetroot.....I'm thinking that I'll roast some, possibly pickle some, but let me know if you have any tasty suggestions.

On a slightly smaller scale, we picked our first raspberries from the garden....you really can't beat them!


We're off to collect a new (well new to us) family car tomorrow, our old one was indeed that...old!!! We're all very excited.  Jamie has been asking me lots of technical questions, he's a massive fan of Top Gear and gave me that look, you know the one, when I couldn't tell him how quickly it did 0 to 60..... ho hum.  

Share:

17 June 2014

Drum Roll.........we have a winner!

Just popping in to announce the winner of my Country Girls Tote Bag........

All the names were put in to the bag and with the help of my lovely assistant Jamie, I'm delighted to announce that the winner is.........


Congratulations Heather from Pink Milk !

Oh and before I go, I'm delighted to let you know that the lovely Annette from My Rose Valley, is also taking part on the Around the World Blog Hop, you can read all about HERE.

Hope you're all having a great week and thanks again for entering the Giveaway, sorry you couldn't all win!


Share:

16 June 2014

Around the World Blog Hop

I’m very excited today to be taking part in an Around the World Blog Hop, having been invited to do so last week by Chrissie, you can read her brilliant post HERE.  The idea is to answer a question or two about your creative process and work and to invite others to join in the fun. At the end of my post you can see who I’ve invited to join in.....

What am I working on? 

Oh now this one is a bit like a guilty confession, not content with one project, I’m currently working on several....

My biggie at the moment is a new quilt for my daughters bed, which I started back HERE.


Unfortunately, other projects have pushed this one to the back burner, but I determined to get it completed this week.  I like to think that this quilt will live with Poppy for many years and maybe one day, be passed on to future generations.

I’m also a Farmers Wife, well not really, I’m actually a RAF wife.  You can read more about my Farmers Wife quilt HERE.  I think this project is going to be with me for sometime, I may have been ever so slightly optimistic at making 2 blocks a week, but hey, I'm always a cup is half full kinda girl!  The end result will I am certain, be worth the many hours it will take to stitch.


Another little quilty project currently in progress involves Hexie’s in some of my most favourite fabrics.  This ones for a publication, so I can not show too much, but here’s just a little teaser!

My‘in transit’ project...doesn’t everyone have one of these.... is my Mini Cherry Pie, I am totally in love this with quilt, you can read all about when I started it HERE.  This is currently being hand quilted at various after school and weekend activities.  Once finished this is going to take pride of place in my newly decorated kitchen, which is my husband’s ‘soon to be’ WIP project!


Embroidery and hand stitching is a huge part of my life.  I currently have several new designs in my sketchbook and I think these will become my next ‘in transit’ projects.


Finally, I should probably also mention the crochet cushion that I started HERE, this is to tantalisingly close to be finished...honestly it really is!

How does my work differ from others of its genre? 
I can't really think of how to answer this, but I guess I had to describe 'my style' in three words it would be ‘pretty, sentimental and uncomplicated’  I can honestly say that I just try to be myself and design things that make me smile or have a personal meaning.  I was taught to sew by my nan and mum, but I know that not everyone has been given this opportunity, so I see writing tutorials and ‘make it’ projects  as a way to share what I know.


Why do I create what I do? 
I can not imagine a day passing without at some point either sketching, stitching or doing something creative either for myself, with my children or for my business.  It’s part of me and something that I simply have to do without question....it makes me happy and content.


I also feel incredibly lucky to part of the handmade community, through blogging and other social platforms, but also through Pretty Fabrics and Trims, which put’s me in contact with other makers on a daily basis.  

How does my writing/creating process work?
I have a sketch book always close to hand and a notepad by the side of my bed.  It’s amazing how some of my favourite ideas have come to mind in the middle of night!  Nearly everything starts out as a rough (and I mean rough) sketch and then I continue to work on it until I’m happy.  My sketch book is full of ideas for future projects, but first I guess I had better finish some of those WIP’s before I start anything else new.

I’ve loved being part of this blog hop, so thanks again Chrissie for inviting me!  Next week, I’ll be passing the baton on to:

Gillian at Tales from a Happy Place ~ Gillian’s blog is jammed full of the most inspiring and thoughtful blog posts, all of which are accompanied by the most stunning photographs.  (So funny, Gillian received an invite from both myself and Kate at Just Pootling who's also taking part today, so it just goes to show how enjoyable her blog is!)

Gilly from Gilly Makes ~ Gilly’s blog posts always make me smile.  Gilly knits, crochets, makes quilts and sews, all with absolutely stunning results.  Her new ‘Kate’ tunics are just gorgeous!


and :: Edited 17th June 2014..... I'm thrilled to add.....

Annette from My Rose Valley ~ Annette's blog is just beautiful. Her photographs of her life in Switzerland are stunning.  Annette has been as absolute inspiration to me since I discovered crochet.  Her Nordic Shawl pattern is so pretty and it is a must to read the story that influenced it.

If you haven’t already discovered these brilliant blogs....please do ‘hop’ on over!  Thanks again for joining me today and I’ll be back tomorrow with the results of my little tote bag Giveaway.


Share:

5 June 2014

'Make it' a little patchwork bag tutorial


At last I hear you cry!!!!!  Here's my much promised, 'how I make my little patchwork tote bags' tutorial. I love making these bags and once you've mastered how to put them together, you can easily change the outer design.  HERE'S ONE I made for Poppy incorporating an embroidery on the front and patchwork strips on the back and another one HERE, which I made using up some 2"square Tilda scraps.  I hope that you enjoy the tutorial.....stay with me it's quite long, but there's a little surprise at the end, so please do keep on reading!

Ok then..... are you ready........yes........let's get started.........

Things to Remember

  • Read the pattern in full before starting
  • Seam Allowances are 1/4" unless stated otherwise
  • Always press your fabrics before starting
  • Press all seams as you go along


5 different fabrics to form the front and back of the bag.
1 Fat Quarter of a complimentary cotton for the lining.
Wadding/Batting measuring 12 1/2" x 30" (I use a low loft cotton wadding/batting from my stash)
1m of Cotton Webbing Tape.
1m of Ribbon.

Cutting Instructions

From each of the 5 fabric pieces, cut 8 x 3" squares
From the Fat Quarter, cut 2 x pieces each measuring 10 1/2" x 13"
From the Wadding/Batting, cut 2 pieces each measuring 12 1/2" x 15"

Let's get stitching

First off we're going to make the front of the bag.  Lay out half of the 3" squares using the picture below as a guide. I find it useful to lay them directly next to my sewing machine.


The bag front is formed by first sewing the squares together to create the horizontal rows (a,b,c,d & e). I find the quickest and easiest way to do this, is to chain piece them together, which means that you will be working on all 5 rows at the same time.  To do this, start by sewing squares 1a & 2a together and then without cutting your thread (see the picture below) feed the next two squares 1b & 2b in to your machine, and repeat for rows c, d & e.  Cut the thread, once you have finished joining squares 1e & 2e.


This is what it will look like....


Now take the column of squares over to your ironing board and press the line of stitches.  This sets them in place.


Now you can cut the threads in between the squares...

Open out the squares and press the seams in the direction of the arrows, as shown below.  By alternating the direction of the pressed seam, when you come to join the rows, the seams will 'nest' together helping you get neat, matching corners.

Repeat the process, joining columns 1&2 to column 3 for all 5 rows and then finally columns 1,2 & 3 to column 4.  Remember to keep pressing in the direction of the arrows.  It should now look like this.....

To complete the bag front, take row a and row b and carefully line up the seams and pin in place ( as shown below) then sew together.  Repeat until you have joined all the rows together.


You can now see if you turn the front piece over, how the pressed seams all sit neatly.


Repeat the whole process again to make the back of your bag......

Hopefully you are still all with me, time for a cup of tea and a little treat!


Right back to work, baste the front piece to a piece of batting, I use 505 spray and then quilt as desired. I straight line quilted using my machine foot as a guide.  

As you can see from the pictures below, I switched from my 1/4" sewing machine foot to my standard sewing machine foot.  For small projects I have found that this worked absolutely fine, however I have now 'borrowed' (ahem)  mum's walking foot which I have used on subsequent larger projects to great effect!

Repeat for the back. 

Once you've finished quilting, trim away the excess batting/wadding (photo 3).


Moving on to the bag handles, stitch the ribbon to the cotton webbing tape and then cut in half length wise.

Using the patchwork seams as a guide, pin the handle right side down to the top of the front piece, overlapping the handle by 1/2".


Machine in place. I like to go backwards and forwards a couple of time, to ensure that there is no chance of the handles coming away from the bag.  

Take one of your lining pieces and pin right side to right side (the bag handle will be sandwiched in the middle) and stitch using 5/8" seam allowance across the top edge.

Open out and press the seam open (as shown below). Then tuck the lining underneath and press the top of the bag again. By doing this final press, you will find that when you come to turn through the bag later, the lining will sit neatly inside.

Repeat this process for the back of the bag.
Ok we're nearly there.....

Open out the bag front/lining and place right sides together on top of the back/lining, pin in place.  Using the picture below as a guide, stitch using 5/8" seam allowances around the perimeter.

Trim the 4 corners......

and then turn the bag through the opening.  I find a chopstick the most wonderful tool for getting nice points on the corners! (As you can see from how bent mine is, this one has done many hours of valuable service!)

Press and then stitch along the lining opening to close.
Push the lining back in to the bag.  That extra bit of pressing you did early should now be paying you back!

Finally top stitch around the upper edge to hold the lining in place.

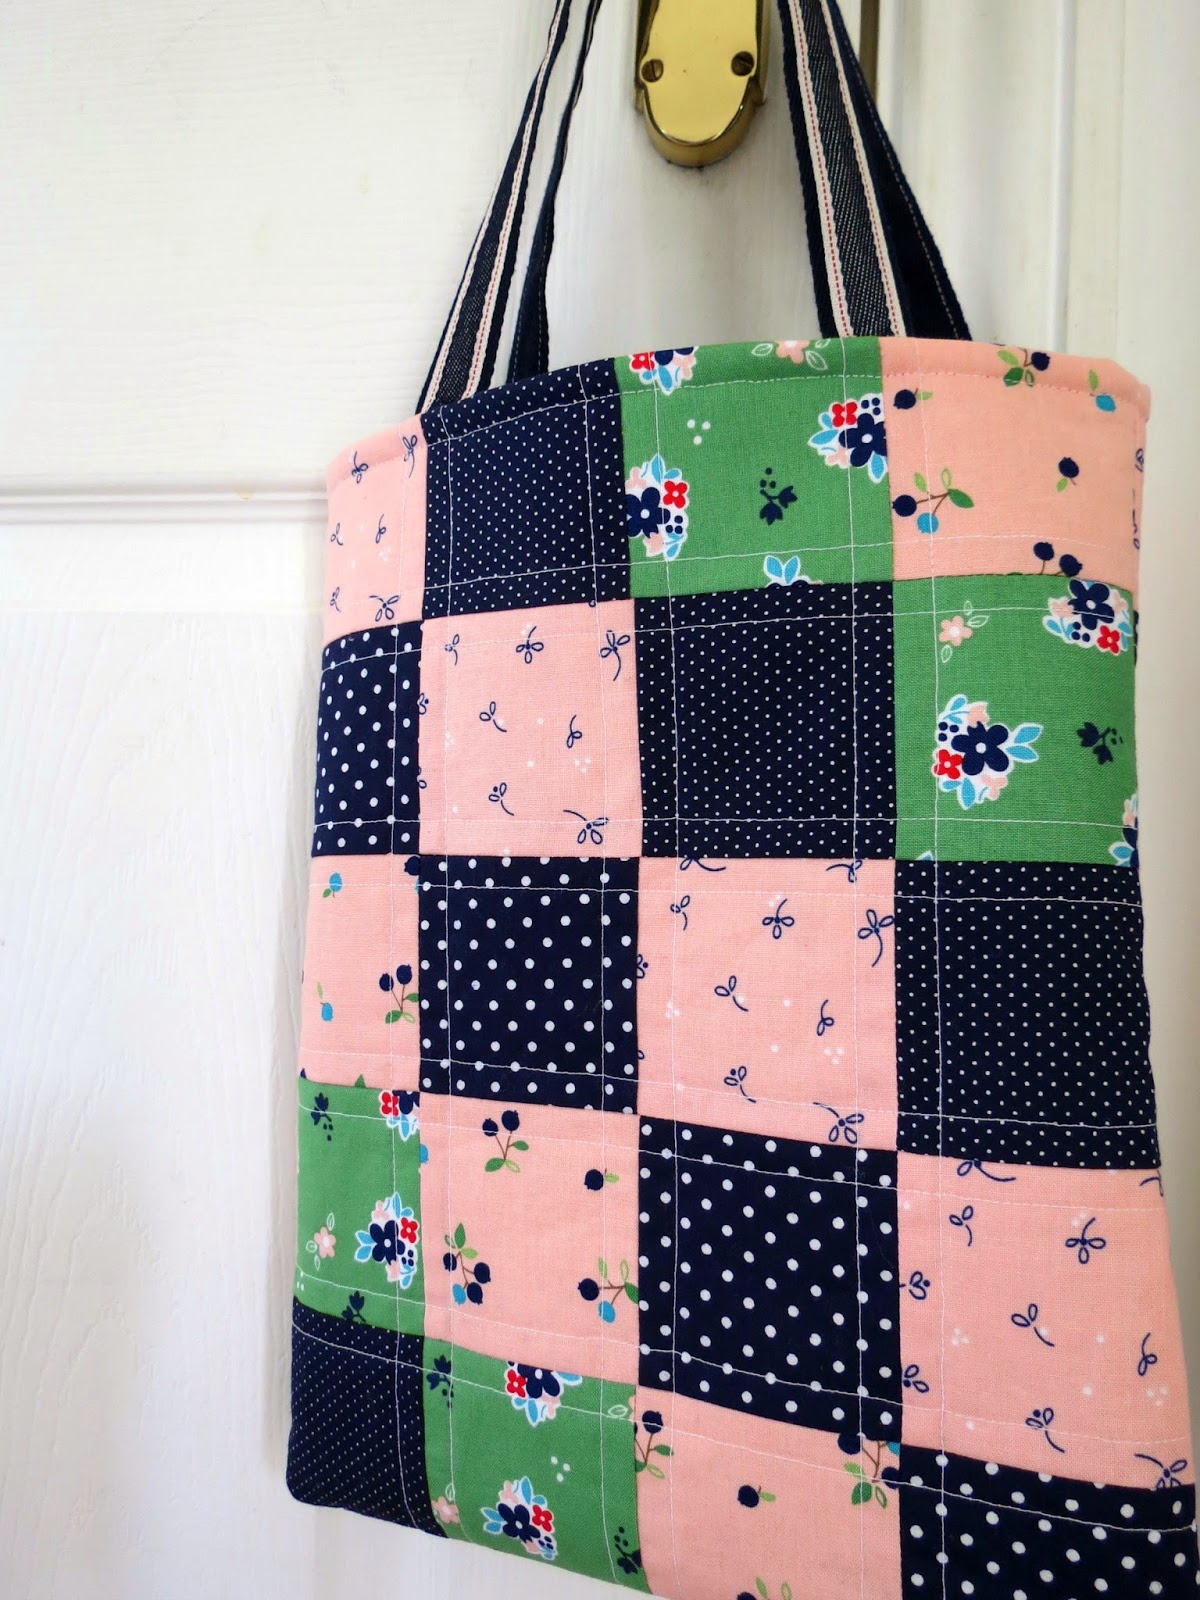
That's it, you're done.....hang up your bag and admire!


Now for the little surprise.......

....... as a little thank you for your patience whilst waiting for this tutorial, I thought it would be nice to have a little Giveaway and I would like to give the bag I made to one lucky reader! 

To enter, please leave a cheery comment below.  The Giveaway will close at midday (GMT) on Saturday 14th June 2014 and I'll pick a winner at random and announce it there after.

Please do let me know how you get on if you make a bag and I would love to see some pictures, so please do email them to me.  If you have any questions or spot any errors, please do let me know.

Happy Sewing!

The small print....... No cash alternative can be offered. The winner will be announced here and if I have not heard from said winner within 7 days, then I reserve the right to redraw. 

:: Edited 14th June, The giveaway is now closed and I'll be back soon with name of the winner.  Thanks so much for all your lovely comments!

Share:
© A Little Happy Place | All rights reserved.
Blog Layout Created by pipdig