27 January 2017

Happy Flower Quilts Blog Hop


Thank you for joining me today for my stop on the Happy Flower Quilts Blog Tour.  I really am SO excited to share my make from the book.  I have been a huge fan of Atsuko Matsuyama for many years and I have coveted collection of her pretty fabrics in my stash. It is true, I regularly do that classic thing of looking and stroking them rather than cutting in to them....you do know where I am coming from, don't you?!  So you can understand when I say that I was extremely excited when I heard on the grapevine that Zakka Workshops were publishing an English version of the elusive 'pink book' and even more excited to discover an email from the lovely Lindsay at Zakka Workshop advising:

  1. That in addition to Lindsay, Kristyne Czuperyk from Pretty By Hand, (one of my favourite bloggers), is one of the technical editors....so I just knew it was going to be good
  2. That my Quilt Shop 'Pretty Fabrics and Trims' is listed as one of the resources in the book....and
  3. That they asked me....yes me... to be on the Blog tour
I must confess that I whooped extremely loudly ....so much so that even my nearly teenage son, raised his head from his tablet to ask if I was ok.....those with nearly teenage children will know that it is no mean feat to draw their attention away from gadgetry!

Before I share more information on my make, I just wanted to clarify that 'Sew Flower Quilts and Gifts' is the UK edition of the book and is, with the exception of the front cover, exactly the same as 'Happy Flower Quilts'.

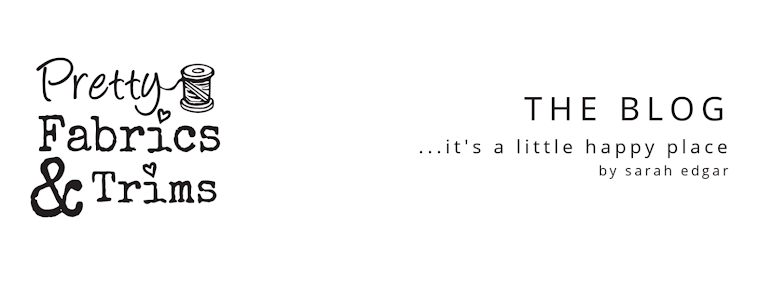
As you can see, I chose to make the Windmill Passport Case from Page 23.  I decided to embrace my inner Atsuko and with the exception of machine sewing the binding to the front and the lace trims, I  hand sewed all of it, which was just so relaxing.

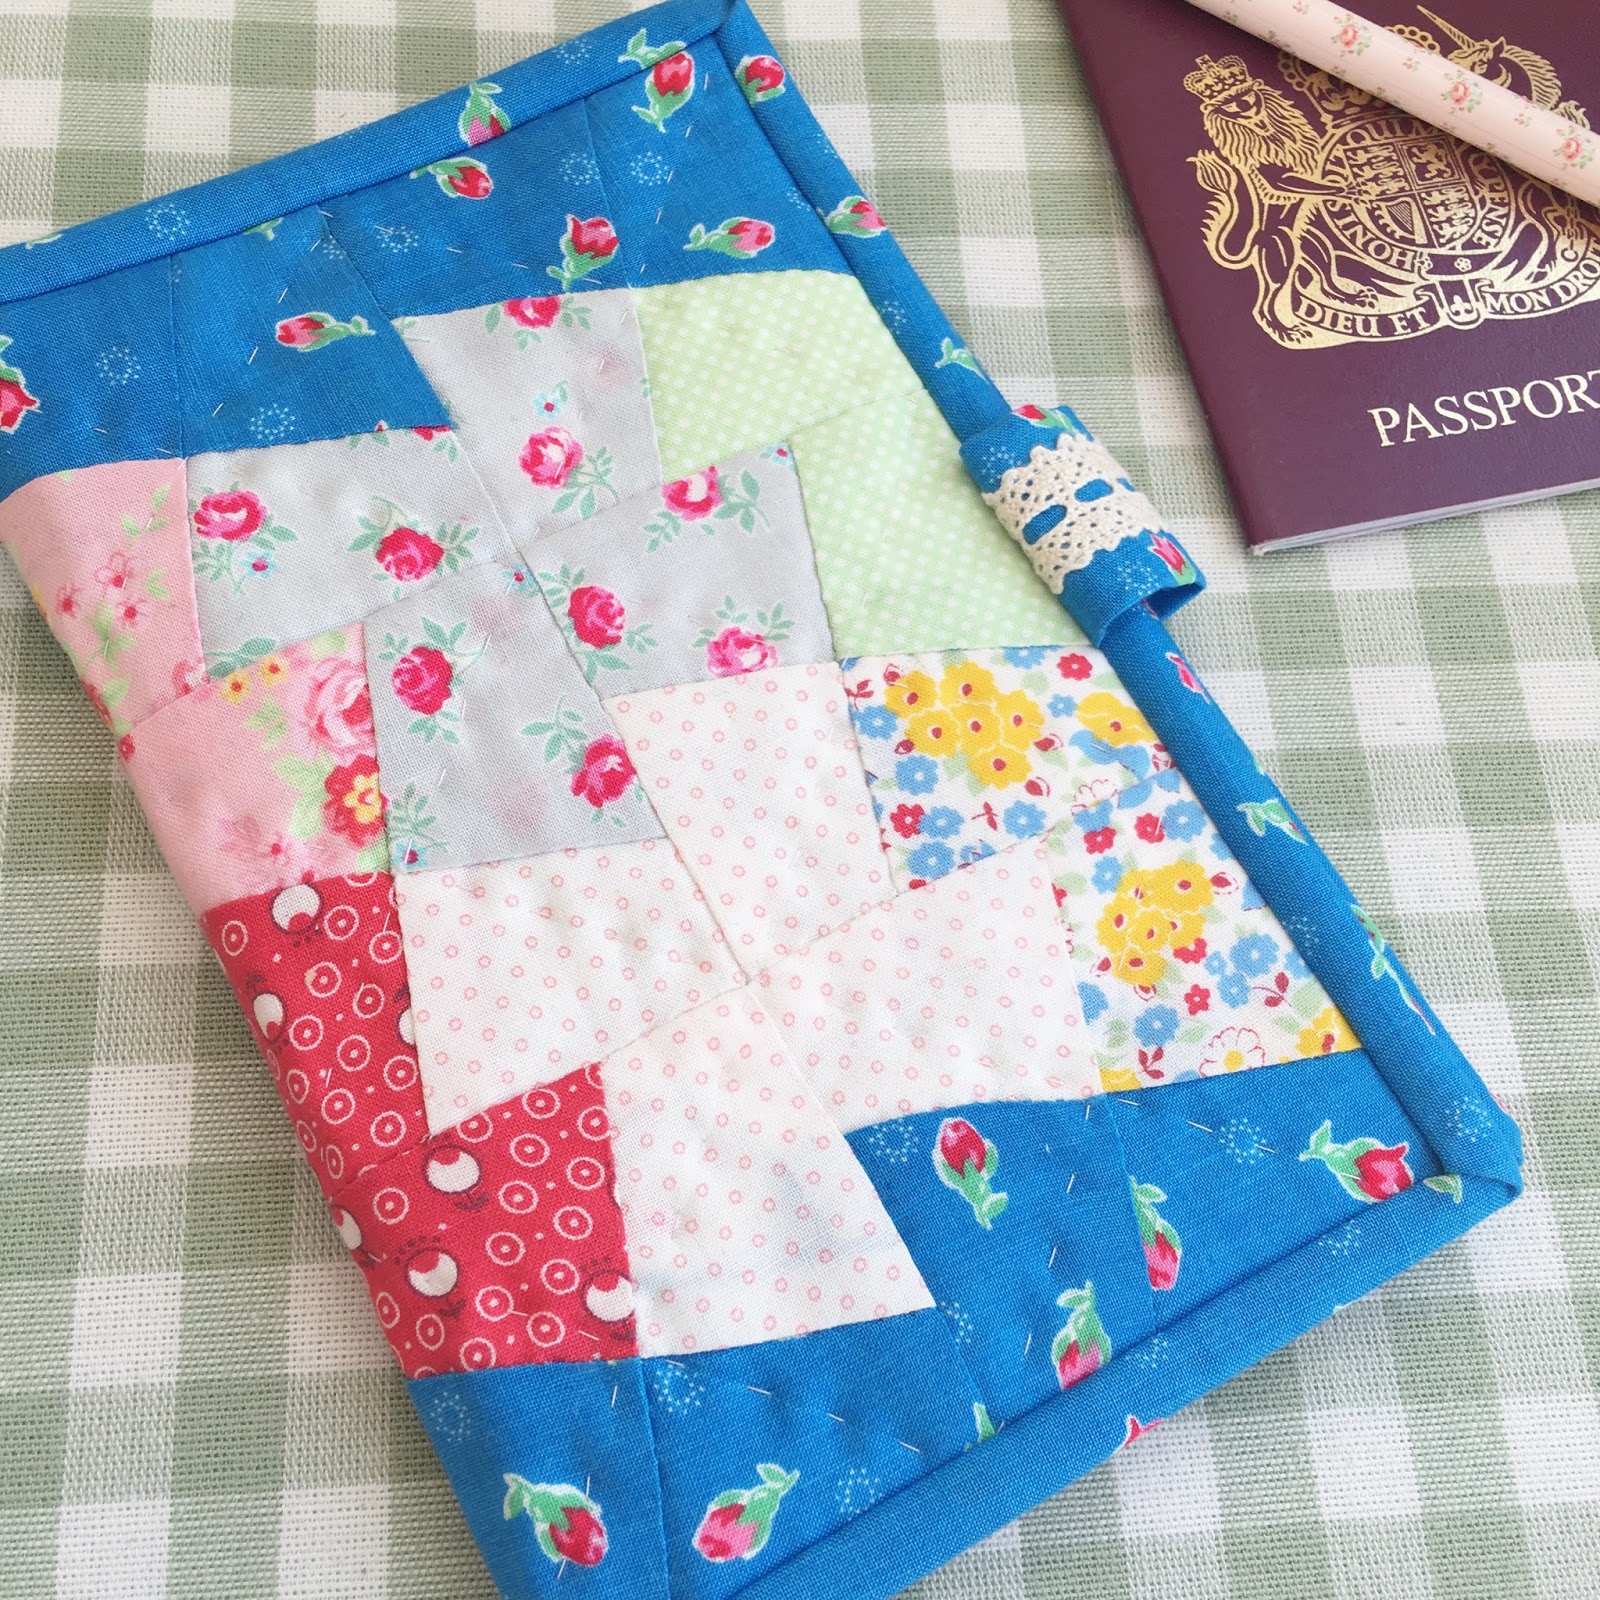
The first step was to make my templates for the windmill block.  For those without a copy of the book, these are provided on pull out sheets at the back.  Having run of template plastic at home, I simply traced these on to Freezer paper which I ironed on to a cereal box and then cut out.   I then removed the freezer paper and in addition to labelling them (A, B,C & D) as per the pattern, I also marked the outer four right angle corners and finally their individual placement within the block (e.g on piece A, I marked the two inner sides that butted up against pieces B & C).


The hand sewing method requires you to draw around the template (which excludes the seam allowance) on to the wrong side of the fabric.  Then you cut out and at this point include a 1/4" seam allowance..... I must admit that I eyeballed my seam allowance and cut out using scissors.   I used a Frixion pen to mark.  None of this process is difficult, but there are a couple things to bare in mind........

Remember that because the shapes for the windmill block are irregular, you need to make sure that the template is placed right side down on the wrong side of the fabric.  This would not be necessary if for example, you were cutting out a square or a hexie where there is no obvious right or wrong way.

You also need to ensure that the template is placed allowing for the correct grain line of the fabric. On the Windmill templates I established this from marking the right angle corner on each of the four templates.  Effectively what is either the right or left hand side of each template i.e above or below the right angle corner (marked by the circle) is what I used to position in line with the fabric grain/selvedge....hopefully these pictures and the explanation below will help...


On picture one, you can clearly see the markings I talked about, but the placement is wrong because the template is right side up.

On picture two, the template is right side down (correct), but it has been placed without thought for the grain line of the fabric (wrong).

On the third picture, the template is right side down (correct) and has been placed allowing for the grain line...see how one of the outer edge below the right angle corner (in the circle) is running parallel to the selvedge.  I also allowed space around all 4 edges for the 1/4" seam allowance

The 4th picture shows the clear lines left by the Frixion pen which I used to draw around the template.  You want to be able to see these lines when it comes to sewing the pieces together.

On the fifth picture I've turned the fabric to the right side, with the template on top so you can see how the placement on the third and fourth picture translates once you have cut out the shape.  This also shows the added 1/4" seam allowance.

Sorry, I didn't take any in progress photo's of how I sewed the templates together, but you will find some very good instructions with photographs in the book.  Here's the finished outer cover before I quilted it.  I love how all the drawn lines match up.  If you have never hand sewed using this method, I really urge you to give it a go!

I pretty much followed the instructions word for word, my only deviation being to omit the inner case lining.  The pattern calls for the outer cover to be layered (windmill piece / wadding / backing fabric) and then once quilted..... (I hand quilted the cover using Aurifil 50 wt in a very pretty pale pink #2410) .... you then add a separate inner case lining which is what you effectively see under the pockets.  I decided to use the quilted piece as is and have my quilting visible from the inside rather than have this additional lining.

When it came to the pockets there were templates (minus seam allowances) provided for these too.  With the exception of Pocket C, which has the curved upper edge, rather than using these, for the pockets that were simple rectangles, I simply measured the templates, added on a seam allowance and used my quilting ruler and rotary cutter to cut these out.
I couldn't resist adding a little fabric label which I made using a rubber stamp I had in my stash and stamping on to some linen. I ironed this to 'set' the ink and used light weight interfacing (Vilene L11 30) to turn it in to an applique.


I used a mix of Lecien fabrics from the shop, I love how all their collections mix together so prettily!


All in all, it took me a couple of evenings and a Saturday afternoon when I got home from work to make and every stitch was extremely enjoyable.  I can not wait to see what my fellow bloggers make, they're all so ridiculously talented.....here's the schedule which includes their instagram accounts and blog names:

January
23    Kristyn    @prettybyhand     prettybyhand.com   
25 Lisa         @aspoonfulsugar aspoonfulofsugardesigns.com
27 Sarah @prettyfabrictrims alittlehappyplace.blogspot.co.uk
30 Minki @zeriano      minkikim.com
February
1 Heidi @fabricmutt fabricmutt.blogspot.com
3 Clara @claralovestosew Instagram Only
6 Ange @alittlepatchwork alittlepatchwork.wordpress.com
8 Erin         @whynotsewquilts whynotsew.blogspot.com
10 Lauren @transientart transientart.com
13 Sedef @downgrapevinelane downgrapevinelane.com
15 Ayda @cafenohut cafenohut.blogspot.com
17 Renee @sewnwithgrace sewnwithgrace.com
20 Heather @vintagegreyhandmade vintagegreyhandmade.blogspot.com
22 Melissa @ohhowsweetco ohhowsweet.com
24 Greg @greydogwoodstudio greydogwoodstudio.com
27 Stacy @stacyolsondesign stacyolsondesign.com
March
1 Wynn @zakkaart zakkaart.blogspot.com

You can also search using the hashtags: #happyflowerquilts & #happyflowerqal

Oh and have you heard, there's going to be a Quilt Along starting on the 6th March  to make the uber gorgeous Sampler Quilt from the book.  The Quilt along is being co-hosted by Kristyn at Pretty by Hand, Wynn at Zakka Art and Melissa at Oh How Sweet .... so if you haven't got a copy of the book already,  go and get one...you will not be disappointed. (Don't forget friends, there are copies on my website HERE)

In addition, Zakka Workshop are generously giving away a copy of Happy Flower Quilts by Atsuko Matsuyama, to my readers. To enter, simply leave a comment on this post and tell me 'what is your number one project on your wish list to make'......Big or Small I'd love to hear.  The Giveaway is open Worldwide until the 17th February 2017* . The winner will be announced here on this post, (I'll also try to contact you by email, so make sure is poss that you're not a No Reply commenter) so make sure you pop back and check. Good Luck!

*THE GIVEAWAY IS NOW CLOSED, THANK YOU TO EVERYONE FOR ENTERING!

The winner randomly chosen by my husband Andy is Kay who said:

I love EPP and am currently in the middle of making an EPP hex quilt in hexies, but I would love dot also make an EPP quilt with dresden. Thank you for a great giveaway. x

Congratulations Kay, please contact me with your address and I can arrange for a copy of the book to be posted to you!

I hope you enjoyed reading this VERY long post and found it helpful.  Thank you again for visiting!

Share:

20 January 2017

Block of the Month ~ 'A Little Happy Christmas!' ~ The Big Reveal!


Ta da.........  I am so happy to share my latest quilt design which we'll be running as a 9 Month Block of the Month Club, starting next month.  I can honestly say that I had SO much fun designing and making this.  Inspired by happy memories of Christmas...which like many of you I'm sure, include.....hanging the stockings on Christmas Eve, making gingerbread, a Christmas wreath on the front door and of course eating figgy pudding on Christmas Day....the design draws on these and more.

Those of you who know me well, know that I loves to make quilts that incorporate lots of different techniques (I think it could be an indication that I have a poor attention span and need the variety!) and I LOVE, LOVE, LOVES hand stitching..... is there a better way to spend the evening I ask!  This quilt certainly doesn't disappoint and includes lots of hand stitches with English paper piecing, applique and embroidery featuring, along with of course, some machine piecing.

Here's some more pictures for you.........


The fabrics I used are mainly a mix of Moda, Tilda and Lecien, carefully chosen to give the quilt a warm and timeless feel.  I really hope that this quilt will be enjoyed and cherished for many years to come....a new family tradition maybe as it is unpacked each year?

I thought it would be useful to share some more information about the Block of the Month club, so I've done it as a Q & A .............


What is a Block Of The Month (BOM) Club and how does it work?

A block of the month is a monthly parcel full of loveliness that you will receive directly through your letterbox. It will include all the fabrics and if required, English Paper Pieces for you to sew that months block, plus of course detailed instructions for how to piece the block will also be included.  We'll also be sharing handy tips on the blog to help you along the way.

The 'A little happy Christmas!' Block of the Month, is a 9 Month subscription running from February 2017 up to and including October 2017.  Leaving you time to quilt (Sarah chose to hand quilt hers in Aurifil 40wt thread) and bind your quilt in time for Christmas!

At the end of the term you will have received enough pretty fabric and instructions to make your very own 'A little happy Christmas!' Quilt Top.

How big is the finished Quilt?

The Quilt measures 44" x  53"

How long will the Club run for?

The club will run for 9 months commencing in February 2017 and will run through to and including October 2017.

What techniques will be used?

The quilt combines a mix of Machine Piecing, English Paper Piecing and Applique*.
*I used the Turn Through Interfacing method for my applique, but you could use Needle Turn or Raw Edge.... it is entirely up to you.

Will I receive exactly the same fabrics as Sarah used?

We will as far as possible send the same fabrics as Sarah used, if this is not possible then rest assured we will send something equally as scrumptious!

What threads did Sarah use?

Sarah used Aurifil 50wt thread for both the machine piecing and for the EPP and applique.  Aurifil 12wt thread was used for the embroidery.  We will be putting together an Aurifil thread pack to co-ordinate, more information to follow.

Will there be a Facebook group for Club members?

Yes......... we have a dedicated Facebook Group for our Block of the Month Club members!  It is a private forum only open to Pretty Fabrics and Trims Block of the Month club members, somewhere where you could share your progress month by month, ask for advice from fellow club members, to share helpful tips and to make quilty friends.

Can I purchase the pattern on its own?

No, not at this moment in time......Sorry!

How do I join?

Places for the club are limited and all our friends and customers from across the world are invited to join.

The monthly Club cost including postage is:

UK Club Price ~ £18.00 (Via 1st Class Mail)
EU Club Price ~ £21.00 (Via Standard Airmail*)
International Club Price ~  £22.50 (Via Standard Airmail*)

*Should you wish to upgrade to Priority Mail please do get in touch.

You can join via the website HERE.

When and how will I make my payment?

The first months payment will be due on the 21st February 2017 and subsequent payments will be due on the 21st of each Month. Parcels full of loveliness will be posted within 2 working days of payments being safely received.

Payments will be made by a monthly subscription service via your Paypal account to us, for those of you already in our Flirty 30's Club or our 'A little happy year!' Block of the Month Club will be familiar with this.  By setting up a Paypal subscription to us your monthly payments will automatically be debited from your Paypal account each month.  Once it is in place you do not need to do anything, with the exception of cancelling the subscription at the end of the Block of the Month. Don't worry we will remind you and should you inadvertently forget, we will obviously refund any over-payment without hesitation!

We will contact Club members nearer the time to arrange this.

We are also more than happy for you to make your monthly payment to us from your Bank Account directly into our Bank Account, should prefer this method, simply get in touch once you have signed up and we will provide you will all the required information.

We are sorry, but Vouchers or Coupon Codes cannot be used to purchase a subscription.

The monthly bundle cannot be shipped with other shop orders or other Subscription/Block of the Month parcels, we're sorry for any inconvenience!


I hope that you will join us and if in the meanwhile you have any questions unanswered, please do not hesitate to get in touch!
Share:

7 January 2017

A little happy Tutorial ~ English Paper Piecing ~ Diamonds & Stars


Happy New Year!!!  I hope that you all had a lovely Christmas break!  I thoroughly enjoyed myself and both mum and I got to recharge our batteries a little and spent lots of quality family time.  One of my main goals this year is to focus on balancing work/family, but I won't lie it's a hard one!  Unfortunately, my New Year hasn't quite gone to plan, as I took a little tumble on the stairs on Tuesday and sprained my ankle.  However as they say, all clouds have a silver lining which has meant plenty of time for hand stitches....my favourite!

By co-incidence, this months block for our 'A little happy year BOM' includes English Paper Piecing and one of my favourite shapes, a six point star.  I thought it may be useful to show how I prepare and stitch these lovely stars.

As I've mentioned before I love to sit on an evening (and after injury ha ha) and English Paper Piece, so generally I cut my fabric by holding the paper template against the fabric and roughly cutting the fabric with scissors with a generous 1/4" seam allowance.  When I'm more organised I use a Rotary Cutter, which is of course much quicker, for this I allow a 3/8" seam allowance.

This picture shows how if required you could cut multiple diamonds in one go.  I simply lay out the diamonds allowing an aprox 3/8"s seam allowance ( I eyeball this) and then I'm able to cut multiple diamonds with minimal cuts. (can you see where the triangles are, these could easily, if the fabric piece was larger, produce more diamonds)


Fabric cut, it's time to baste.  I am now a convert to the glue basting method and I use a Sewline Glue pen (I'll pop a supplies list at the bottom), which, when used goes on blue and dries clear.  I start in the top right.......

 and move clockwise around until all 4 sides have been glued ....

For this tutorial I am making a 6 point star, which requires six 6 point diamonds.  Did you know that 6 point diamonds also work well with hexagons and equilateral triangles and you can make some really pretty EPP shapes?  You can also get different size diamond shapes, for example 8 point diamonds, which create an 8 point star, these also work well with squares...oh the pattern combinations are endless!  The preparation for 8 point diamonds and triangles is the same as above.

Can you see from the picture below that all my diamonds are glued in exactly the same way, so the little tails are pointing in the same direction, this will make it so much easier when you come to stitching them together.
I like to lay out my diamonds out in order that I'm going to sew them....can you see how the tails all pointing in the same clockwise direction....

I then stitch the diamonds together using tiny whip stitches (as shown HERE) into two sets of three.  As always I use Aurifil 50wt in a shade to match my fabrics.
 Then to finish, I stitch the two halves together.  Can you now see that by having the tails pointing in the same direction, this helps the diamonds to lay flat and helps reduce bulk.
For the BOM the stars are appliqued to 4 Patch background, so at this point I press my star, which will help keep the crisp outer edges in place and then I remove the papers.  This is done by carefully lifting the glued edges with my finger.  If you were making a larger EPP shape joining lots of diamonds, you would not remove the papers until each one was surrounded by another diamond.

Coming back to the BOM, to centre the star on the 4 patch is easily done by matching the seam lines on the 4 patch with the seam lines and points of the star as shown below.  The star is held in place with my Clover applique pins.
I appliqued the star using tiny little stitches, again using thread to match the star and not the background.  
 I stitch the long side of the diamond (i.e the side without the tail) first and then put a little holding stitch at the point, this gives you a barrier to help tuck the tail in.  If necessary you can trim a smidge of the tail, but be careful not to cut too much away.....
  Repeat this process until all points of the star are appliqued.

That's it, nice and easy.  I hope that you find this 'A little happy tutorial' useful......here's a close up of my finished stars on my 'A Little Happy Year' quilt........


If you missed out on this Block of the Month (or fancy joining another one!) watch this space, as I'll shortly be doing the grand reveal on our next festive Block of the Month 'A Little Happy Christmas'......which just so happens to have another variation of the 6 point star!

As mentioned here's a list of the Scrummy Supplies I used this time......

Sewline Glue Pen ~ available HERE
Sewline Glue Refills ~ available HERE
English Paper Piecing Papers ~ available HERE 

See you again soon!
Share:
© A Little Happy Place | All rights reserved.
Blog Layout Created by pipdig